Showing posts with label Spellbinders. Show all posts

Thursday, December 15, 2011

Snowing Joy

Some more Christmas cheer coming at you! Christmas colors are in all forms now a days. This card features browns, burgundies, and olive greens.

This card was created using Gingham Christmas Greetings. 

Close up shot of the stamping and die cuts
 
Enjoy and see you tomorrow!

Wednesday, December 14, 2011

Snowbody Like You

The next few days I will be posting ideas for Christmas cards. If you are a last minute crafter, you still have time to make some cards and get them out. Or if you are already planning for next year, I hope you get an idea or two. Enjoy!

This card was created using Kissmas & Mistletoe.

 
Enjoy following the next few days!

Monday, October 3, 2011

Chick Challenges Blog Hop Day 3


 Welcome to the Chick Picks Blog Hop, celebrating the official launch of our brand new challenge blog, Chick Challenges {with Ippity}!  Chick Challenges was created by the Unity Endorsed Ippity Chicks to provide you with inspiring sketches, creative project ideas, and the chance to win some fabulous Ippity stamps!

Our blog hop will run from Oct. 1 to Oct. 5.  Each day, we will feature 5 new Ippity Chicks and their projects.  We will be sharing projects made using our favorite Ippity stamp sets.  To sweeten the deal even more, Chick Challenges is giving away Ippity stamp sets to (2) lucky commenters!

To win, you must: 1) become a "follower" of the Chick Challenges blog (www.chickchallengeswithippity.blogspot.com); 2) visit each stop on the hop and leave a comment; and 3) come back to the Chick Challenges blog and tell us what YOUR favorite Ippity stamp set is.  (You can view all of Ippity's stamp sets by clicking on the "catalog" tab at the top of the Chick Challenges blog.


Here is the hop order for Day 3:

Kimberly Cook YOU ARE HERE


 To pick a favorite {ippity} stamp set was extremely difficult because I love them all. However, for this blog hop, I picked ALL things are POSSIBLE. I believe this stamp set has no boundaries. I chose to create my card focusing on the ribbon being pink. Pink, we all know, is the awareness ribbon color for breast cancer. 

Here is a link to a website that I found that list out all of the Awareness Ribbon Colors. When I was reading over the list, I was surprised to see that Celiac Disease had a ribbon color since I always see the butterfly representing the disease. For more information about Celiac Disease, go to www.celiac.org


Here is my creation using ALL things are POSSIBLE:

Detail shots


Copic markers used: R81 - Rose Pink; Y21 - Buttercup Yellow; and  
YR30 - Macadamia Nut
 
I will be giving away some blog candy on October 6th, you must be a "follower" of my blog and leave a comment on this post. For extra chances, you can post comments on any other post this week too thru the 6th, but remember to comment on this post for sure. To one random follower/commenter, I will be giving away the beautiful set that I used to create this card - ALL things are POSSIBLE. Good luck! 

Your next stop on the blog hop

Saturday, October 1, 2011

Halloween Page and Card Class/Kit available

Come join the fun! Have fun creating this Halloween page and card along with learning some cool techniques. The class includes all supplies to create the layout and card and you take home the stamp set - That's Creepy. All the fun is only $25. Unable to attend the class but still want to learn, sign up for a class kit. Just choose the proper add to cart buttons when signing up. Space is limited - so sign up 
 quickly.


Kit (Some supplies may vary from what is shown)
$25.00

Thursday, September 22, 2011

Many Paisley Thanks

Creating a thank you note that can be sent to a man or woman can be a challenge in itself sometimes. 

I kept this card simple by using kraft paper and light blue cardstock. I used Bitty Pixie Paisley stamp set with cobalt and chocolate inks to stamp the images.

The "many thanks" is stamped inside a Spellbinder Nestablities label die with the edges inked.

The twine is threaded from the back of the button so that the twine could be tied into a bow.
 

Enjoy!

Monday, September 19, 2011

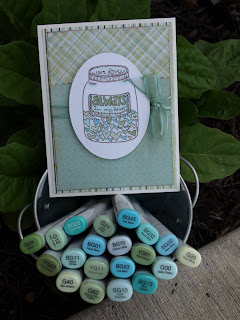
A Jar full of Love

A Jar full of Love is something that we all wish we had sitting in our kitchen as one of our ingredients. Something that you could add to any recipe that you are baking or cooking and it would just add love to the people who ate your creation. If making everyone see and feel love in the world would be that easy. 

This is my little creation that I hope can show that love can be shown just that easily. I used Quotes a'la HAPPY to create this card of love.

To add a touch a character to the patterned papers, I inked the edges with Color Box Chalk Ink in Dark Brown. The oval was cut using a Spellbinders Nestabilities and the coloring was all completed using a plethora of Copic markers. To soften the look, ribbon was tied to the right side of the stamped image. 

Copic marker used: BG01 - Aqua Blue; BG02 - New Blue; BG10 - Cool Shadow; BG11 - Moon White; BG13 - Mint Green; BG23 - Coral Sea; BG32 - Aqua Mint; BG45 - Nile Blue; BG53 - Ice Mint; BG70 - Ocean Mist; G00 - Jade Green; G12 - Sea Green; G20 - Wax White; G21 - Lime Green; G24 - Willow; G40 - Dime Green; G82 - Spring Dim Green; YG11 - Mignonette; YG61 - Pale Moss; and YG63 - Pea Green. 
Seriously, I cannot believe the amount of markers I used to color this little jar.
 

Enjoy!

Friday, February 25, 2011

Flowering Mother's Day

This is my latest creation. I grabbed the sketch and some technique ideas from the latest Stamp It Techniques magazine. If you want to try something new or just need a refresher, I totally recommend this magazine. So this flowering creation is for my Mother's Day cards for this year. I know you are thinking Mother's Day, while yes. I have a list of cards that I create at the beginning of the year then work down on the list. I am excited to say that this is the last set of cards on that list to make. All this means is that I get to move onto the next project.

Copic markers - my new love and obsession. I used R22, R24, R27, and YG93 to create the flower oval, which was cut using the scalloped ovals from Spellbinders.

Next, I added Walnut Stain Distress Ink to the image to give it a more vintage look. Then the layering of ultra thick embossing enamel (UTEE) started. I keep layering on the UTEE until I got a thick layer that would nicely crack. The finishing touches were Jumbo Java Chalk Ink on the edges of the paper and some pearls to finish off the look.
Thank you for looking. Enjoy!